
|
Originally written in 2017 for the We Love Colors Cosplay Contest Rosette was a big project for me, partly because the outfit has so many pieces, and partly because she’s been a dream cosplay of mine for a very long time. I picked up the Chrono Crusade manga when I was about 15, and Rosette immediately became one of my favorite characters of all time. Finally having the skillset and confidence to cosplay her almost 10 years later was beyond special – it was a dream come true! Rosette was debuted at Anime North Texas 2016.    I made nearly every piece of Rosette’s outfit from scratch – sewing is my greatest strength when it comes to cosplay, and I love learning and applying new techniques to my builds. I also love to interpret outfits in a “realistic” way – sometimes outfits just wouldn’t work the same way in real life as they do in a manga, or sometimes little details don’t make sense. (Not to mention contending with inconsistent reference art)! Rosette’s outfit was fun to interpret for “real life”, since her clothes are meant to be utilitarian – she’s a nun in an organization called the Order of Magdalene, which is essentially a group of exorcists. She mostly does field work, and her outfit reflects that – she’s supposed to be able to move fast, as well as shoot things and carry bullets and other supplies, so I planned her outfit with that in mind. I did a ton of research on actual nun habits, too. Her costume is much more revealing and “anime” than any real nun habit, but I gleaned some technical construction info and the names for the different pieces of her outfit from forums for nuns. (Yes, apparently, there are such things as chat forums for nuns! And their comments were pretty helpful, too!)  After doing my research and planning, I got to work. I started out by heavily modifying a pattern (McCall’s 7352), since it was a princess seam dress pattern and Rosette has princess seams on her dress. I used this pattern as the base for her blue dress and her underbust back brace. The dress is made of a blue synthetic grosgrain fabric, which I went to the Dallas Fabric District to find – it was a remnant and ended up being just barely enough! The dress pattern was simple: I modified the plain sleeves of the pattern by using the slash-n-spread method to create puff sleeves, and then cut off the base pattern at the waist so I could add the front and back flaps more easily. Since I had a limited amount of fabric and the waist seam was going to be hidden by the back brace, I didn’t mind having a seam there. It also made the dress a little bit easier to make. The dress was fully lined to the waist; the flaps were not lined because they didn’t appear to be lined in the manga, nor did I want to change the drape of the grosgrain fabric. The flaps were finished with a double-fold hem. The dress zips up with two invisible zippers: one at the side, and one at the center back. I couldn’t extend the back zipper beyond the waist line, since I didn’t want a seam on the back flap, so the discreet side zipper lets me slip into the dress, and the back zipper lets me get my head through the neck hole.  The waist brace is made like a boned bodice; I call it a “brace”, even though a lot of people interpret it as a corset. I just didn’t think a demon-slaying nun would wear a corset, nor does it ever cinch Rosette’s waist in, so it made the most sense to me to call it a “brace”. It’s definitely a strange piece, though – the shape is reminiscent of an underbust corset with shoulder straps. The fashion fabric is denim, since I thought the fabric looked utilitarian enough to be appropriate, and vinyl or pleather seemed out of place based on reference artwork. I patterned the brace by using a mockup of the same pattern I used for the dress – I drew the shapes I wanted while it was on my body, and then cut on these lines to make a pattern from it. The brace has three layers: the outer fashion fabric is an off-while cotton denim, the inner “support” layer is flowery cotton twill, and the lining is a thin white cotton. I put rigilene boning in all the vertical seams of the support layer to help keep the shape of the brace. The brace zips up at the back. For the details (hanging straps and horizontal front straps), I used purchased belting and spray-painted some plastic parachute buckles.  The brace is the piece I made the most modifications to from the reference art. First, I left the seams from the princess seam pattern as-is; part of it was just thinking they looked pretty, and part of it was that the seams were a convenient place to add straps in the front. In the reference art, the brace has two random rectangles in the front; I didn’t like that much, so I added belting and a parachute buckle to make them seem like they belonged there. The vertical seams let me attach the belting in a way that visually made sense, even though the buckles still don’t do much except look pretty. I also scratch-drafted the “ribbed” strap details hanging from the bottom of the brace, and then underlined them with fleece to make the topstitched details more 3D. When the straps were finished, I went over them again with a thicker topstitch thread to add even more emphasis to the details.    I scratch-drafted the veil and wimple. The veil is made of the same blue grosgrain fabric as the dress; the white on the dress, veil, and wimple is all a white mystery fabric that has a slight peachskin texture to it; it reminds me of a thick sateen with a peachskin face. The veil was a simple half-circle attached to an interfaced rectangle, and it has a couple of discreet elastic straps that keep it on my head. (I used the advice of forum-posting nuns to go with the half-circle shape)! The veil was cleanly hemmed using a double-fold hem – since circular double-fold hems are a little trickier, I used the “stitch the fold lines and iron them” technique.   The wimple took a little bit of trail-and-error to get the proper pattern for. The collar of the wimple is stuffed with quilting batting to give it the “puffed” look it has in the manga. The black detailing is some black piping I found in my stash. The wimple opens in the front with a regular separating zipper, and is also fully lined. The green pouches (two in front, one in back) were scratch-drafted too, and attach to the belting hanging from the bottom front of the brace with snaps. The green fabric is a green linen I found at Joann; I liked that the color and texture reminded me of army pouches from the World Wars, and since Chrono Crusade takes place between them (in the roaring 20s), I felt it gave the pouches the “right” look. The pouches are supported with heavy interfacing and are lined with the same cotton twill as the brace. This means that when you open any of the pouches, they have pink flowers inside… it’s a little silly, but I felt Rosette’s character would like that detail, so that’s why I didn’t try to find a plainer/green underlining. (She’s canonically shown to like girly things!) The black straps on the front pouches were made of grosgrain ribbon and more purchased plastic buckles, making the pouches fully functional. The back pouch is also fully functional and closes by means of a single snap. My friend Samantha (and fellow Chrono Crusade fan), helped me with fabric cutting and brainstorming on both the pouches and bootcovers, since I was running out of time and she likes learning cosplay stuff from me. Her help was invaluable in speeding up the process of making both! (All the sewing was still me :D) I scratch-drafted the bootcovers using the “cover shoe with tissue paper and masking tape” technique, and then glued them to a pair of base boots I bought on Amazon with Samantha’s help (two hands are better than one for this kind of thing)! They are made of a soft brown vinyl with a little bit of interfacing to help them stand up. The “metal” details on the boots were made from heat-molded craft foam, which I sealed with Mod Podge and then spraypainted silver. I glued the toe piece directly to the bootcover, but I glued the front ankle strap to a piece of ribbon that connected to some metal triangle connectors (it makes more sense in the photo below). The black straps on the boots are real leather and also attach to triangular metal connectors. I bought the triangles on Amazon. Finally, the leather straps had silver studs punched on. 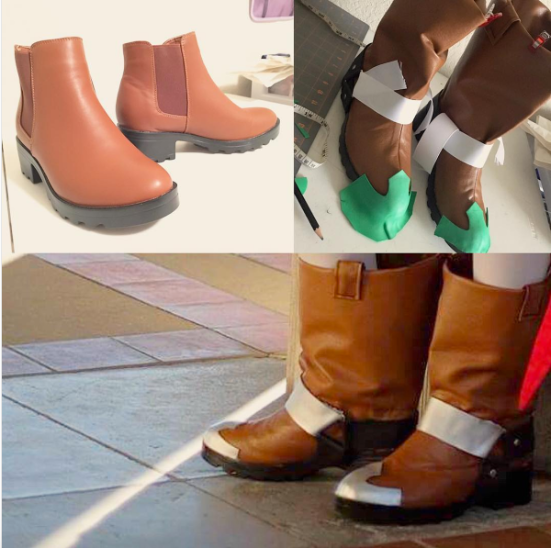 The gloves were modified from Butterick B5370 and are made of the same soft brown vinyl as the bootcovers. They were sewn completely by hand, except for the joining of the white band on the top of the glove.   The We Love Colors thigh-highs needed just one modification: the black rectangle patch, which was glued on with fabric glue while I was wearing them to ensure a perfect look. 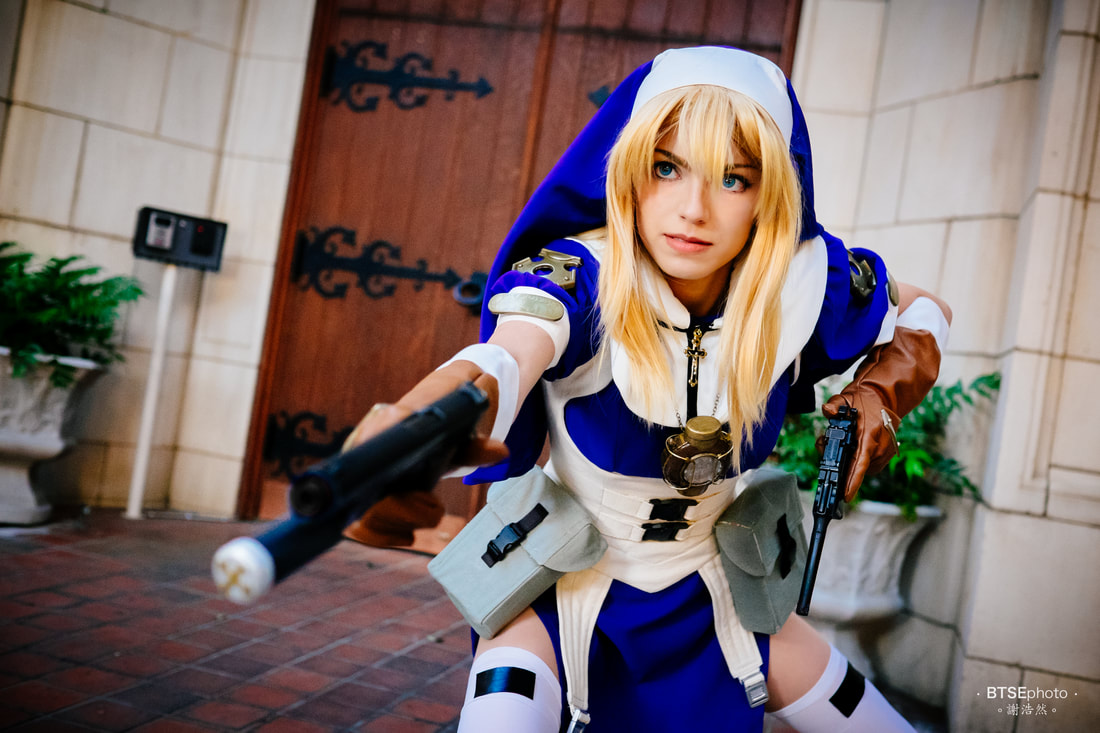 There are some details of Rosette that I did not make myself. Since she was a dream cosplay, I wanted every detail to be perfect; therefore, I commissioned friends to make the guns, the pocket watch necklace, and the gold “badges” on the sleeves and gloves. The guns and pocket watch were made by Mushety Props, and the badges were made by Callula Cosplay. The guns are modified BB guns (chosen because they look like the actual model guns used as reference by the manga’s author), and the watch was 3D printed and hand-painted. The badges began as craft foam shapes, which were then molded and cast out of resin. The “paint” on the badges is cold-cast with a bronze finish, so it won’t chip off or flake. We heat-molded the badges until they curved appropriately for where I wanted to place them, and then I glued Velcro to the badges and hand-stitched Velcro to the sleeves in order to attach them. (I opted to make the badges removable for the sake of being able to machine wash the dress.) Callula cast me two cross badges and four oval badges. Two ovals were for the sleeves, and two were for the gloves. I left the sleeve ovals as-is, but for the ones on the gloves, I cut the ends off the ovals to make them rectangular. Next, I glued half a plastic pearl onto the ends to simulate the “screws” that show up on the reference photos. I painted the pearls with a gold paint pen, then glued the badges directly onto the gloves. The wig is an Arda Wigs “Eowyn” in the color “Pale Blonde”. It didn’t need much styling: I trimmed it shorter with a razor, and then fluffed up the bangs with a little heat and hairspray. Since she’s a nun, I figured she probably wouldn’t wear makeup at all, so I kept my look toned-down and “natural”. The most difficult part of her makeup was coloring my eyebrows – I have thick, dark eyebrows, and changing them to blond is a challenge. I used a technique I’ve figured out that uses a combination of yellow eyeshadow and colored eyebrow mascara to lighten them.  The build time for Rosette was roughly three weeks, and I’m extremely pleased with the result. It was super cold the day I debuted her, though, so someday I hope to wear her again when I won’t freeze my butt off! PROP CREDITS
Mushety Props Callula Cosplay PHOTOGRAPHER CREDITS BTSE Photo |


 RSS Feed
